Agenda App & Website: Configure
How do I create an Agenda App publication?
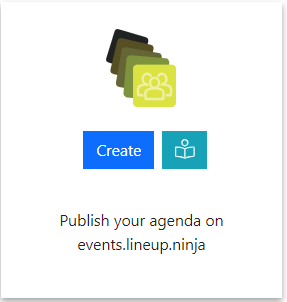
- Navigate to >
- Select ‘Publish your agenda on events.lineup.ninja’
How do I set up the general configuration for the Agenda App?
When you create a new Agenda App publication, a pop up box will open to configure. The first section is the General Configuration where you can set:
- Name - The name for this specific publication
- Subdomain - This is required to publish your Agenda App
- Description - A description of the event (optional)
- Which time zone should sessions be shown in
- Which file types do you want to share with attendees
- When showing a session, sort the speakers by
- Tracks - The tracks to be published
- Resources - The resources to be published
- Labels - The labels to be published
- Speaker Roles to show - The Speaker Roles to be published
- Navigation Items - These will appear at the top as a kind of ‘menu’
- Agenda Search
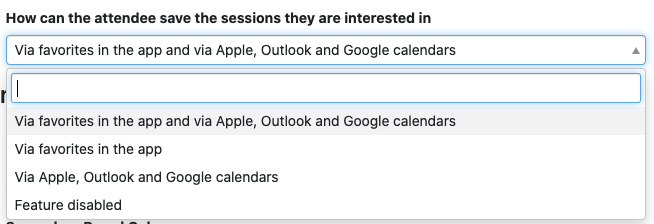
- How can the attendee save the sessions they are interested in
- Time Indicator
- Limit Session Height - If you have sessions with many speakers, you may want to limit the height so attendees can see more sessions at the same time
- Session Code
Note
These can be changed at any time (apart from the subdomain once published!)
How do I configure the Agenda App Branding?
In the Branding section of the agenda app configuration. You will see three sections, Header and Logo Image, Font and Colors.
Header and Navigation Images
You can optionally add a header image and a navigation logo.
The Header, or banner, image will be displayed across the top of the agenda. The navigation logo is shown to the left of the navigation.
If you are uploading images, you should upload one both for desktop and mobile users.
Font
You can choose to use a Custom Font. Either a Google Web Font or you can upload your own.
If you choose to use a Google Web Font, input the name of the font.
If you choose to use your own font, you must upload a font for the following styles:
- Regular
- Bold
- Italic
- Bold Italic
You can upload a font in either TrueType (.ttf) or OpenType (.otf) formats.
You must also have an appropriate license to use the font you are uploading. We ask you to confirm you have the appropriate license by confirming in the ‘License Confirmation’ option. Contact your font provider for their licensing terms.
In this section you can also choose whether you want links to be underlined, and also to set a font size for the session titles.
Colors
You can set the colors for the text and background colors used in the app.
What are Language / Translations / Dates?
Language/Translations enable you to insert your own terms for:
- Locations
- Speakers
- Sessions
- Tracks
- Resources
- Labels
- Agenda
- Timetable
- Favorites
- Up Next
- On Now
- Search…
- Type at least 3 characters to search
You can also choose whether you want dates to be formatted in the international standard, or to force US style dates.
What is the Timetable Page?
For more information on the Timetable Page view, please follow this link.
Can I show Custom Fields in the Agenda App?
For Sessions you can share the ‘Short Answer’ Custom Field type in the Agenda App. To enable this
- Navigate to >
- Open your Agenda App configuration and scroll to ‘Session Custom Fields’
- For each field choose where you want the field to display. These are the options:
- Agenda List
- Timetable Grid
- Session Popup
What is the Speaker List Page?
The Speaker List Page is the page where the speakers are listed. When configuring the Agenda App, you can choose to include/exclude the speaker company logo and whether you want to highlight certain speakers (using Labels).
Can I choose the content in the Speaker and Session popups?
Yes you can choose which content is shown and in which order. You can use this to share Notes with the users of the app, and make other changes to suit your needs.
- Navigate to >
- Open your Agenda App configuration and scroll to ‘Speaker and Session Popups’
- Change the option from ‘Show Default Content’ to ‘Choose Custom Content’
- Rearrange the options into the required order, and disable any options you want to hide.
How can my attendees share interesting Sessions on social media?
If you wish you can allow your attendees to easily share their sessions on social media channels.
To enable the feature, navigate into your Agenda App configuration and scroll to the ‘Sharing’ section.

When enabled the attendee will see these options when viewing a session:
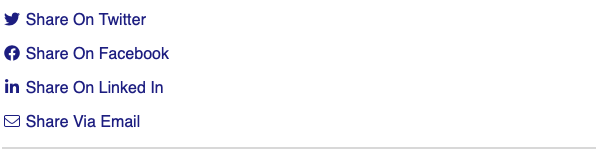
The first option enables or disables the feature.
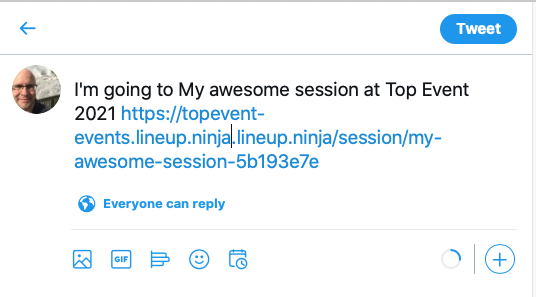
When the attendee chooses to share by Twitter or e-mail, the text will be pre-populated using the template on the second option. For example, it will look like this for Twitter:
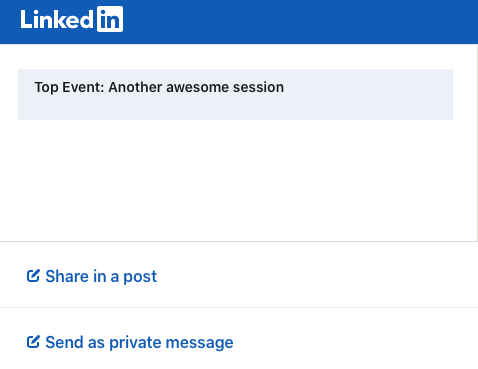
When the attendee chooses to share by Facebook or LinkedIn, the title of the page is used. You can configure this using the template in the third option. For example, it will look like this for Facebook:
Note
Note that when the attendee chooses to share via Facebook or LinkedIn they will be presented with the standard LinkedIn or Facebook share button after they click the link on the session page. This is to prevent these services from potentially tracking attendees who may not wish to interact with these services.
How can my attendees save their Sessions?
Navigate into your Agenda App General Configuration and edit the below setting.
When enabled the attendee will see these options when viewing a session.
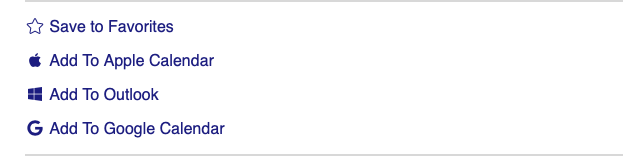
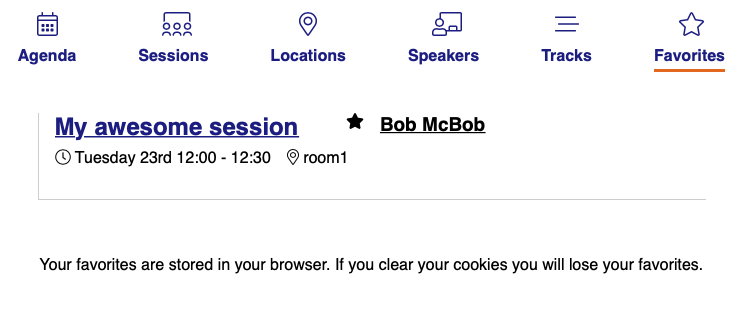
If you enable favorites the attendee can favorite sessions and they will show up in a list like this.
Note
If you are integrating another app for your attendee experience you may wish to leave favorites disabled as they will not appear in the 3rd party application. They only show in the browser the attendee used to favorite the session.
How can I gather analytics on my Agenda App traffic?
If you want to get stats on your Agenda App traffic:
- Navigate into your Agenda App configuration and scroll to the ‘Analytics’ section
- Input your Google Analytics 4 Google Tag
How can I filter the published content?
You can filter which Speakers and Sessions will be published based on a number of criteria. Some common use cases for filters are:
- Preventing ‘Placeholder’ sessions from being published
- Holding back a Speaker who is not yet ready to be announced
- Excluding sessions scheduled during the ‘build up’ day for the event
- Only publishing speakers who have confirmed their slot
- Removing a particular location, or track from the published schedule
- Anything you can think of using labels!
For Speakers you can filter in 3 ways
- Choose which speakers are to be published based on their relationship to sessions
- (If Speaker Confirmation is enabled): Publish speakers that have a confirmed session that is published and not filtered out.
- Publish speakers that are speaking on any session that is published and not filtered out.
- Publish all speakers
- Publish no speakers
- Apply more granular filters with labels
- Only publish speakers with a particular label. For example you might want to use a ‘Content Reviewed’ label to flag speakers that have had their content reviewed.
- Exclude speakers with a particular label. For example you might want to exclude a ‘Do not publish’ label to prevent publishing of speakers who are not yet ready to be published.
For Sessions you can filter in numerous ways
- Choose which sessions are to be published based on their relationship to speakers
- Publish All Scheduled Sessions. Publishes sessions regardless of whether they have confirmed speakers or not.
- (If Speaker Confirmation is enabled): Publish sessions that have one confirmed speaker.
- (If Speaker Confirmation is enabled): Publish sessions that have all their speakers confirmed.
- Publish All Sessions (available on Lineup Ninja Agenda App only)
- Apply filters with labels
- Only publish sessions with a particular label. For example you might want to use a ‘Content Reviewed’ label to flag sessions that have had their content reviewed.
- Exclude session with a particular label. For example you might want to exclude a ‘Placeholder’ label to prevent publishing of sessions which are not yet populated.
- Filter by location
- Only publish sessions in a particular location, or locations. This can be useful if you are publishing an agenda for just one or two locations.
- Exclude sessions in a particular location, or locations. This can be useful if you have scheduled sessions in your Green Room or similar back stage location.
- Filter by resource
- Only publish sessions needing a particular resource. This could be useful if you are producing an agenda for a particular team that manages some resources.
- Exclude sessions needing a particular resource.
- Filter by Date
- Only publish sessions in a date or dates. Useful if you are producing an agenda for a particular day.
- You can exclude a date or dates from your publication. Useful if you have dates for build up and tear down in your agenda.
- Filter by Track
- Only publish sessions in a particular track or tracks. Useful if you are producing separate agenda for separate parts of your event
- Exclude sessions on a particular track. Can be useful to block presenting of a track until a product launch has happened.
To configure filters:
- Click ‘Publish Agenda’
- Click on the name for your existing publication
- Click ‘Configure’
- Expand either the ‘Speaker Configuration’ or ‘Session Configuration’ section
- Expand the corresponding ‘Filter Speakers’ or ‘Filter Sessions’ sections and configure the filters you need
- Save and republish
This video uses the example of an event with sessions in multiple languages to show how to create labels, apply them to speakers and sessions, and use them to publish different content to different publications in different languages:
How are Titles and Post Nominals Handled?
To manage this, navigate into your Agenda App configuration and scroll to the ‘Titles and Post Nominals’ section. For both, you can choose to:
- Stop publishing either Titles or Post Nominals
- Filter out common Titles or Post Nominals. For example, you may wish to filter our Mr, Mrs, Miss and keep titles such as Dr and Prof.
How can I merge locations, tracks and roles when publishing?
When publishing you can merge content together. This enables you to publish a simpler agenda for your attendees than the one you are using to plan your event.
You can choose to merge these types of data:
- Locations. Merging location A into location B will show all sessions in location A as taking place in location B. This can be useful if you have multiple locations configured for scheduling purposes that will be experienced by the attendee as a single location.
- Tracks. Merging track A into track B will show all sessions in track A as being in track B. This can be useful if you have some tracks with only a small number of sessions and wish to present this sessions as being in a more populous track.
- Roles. Merging role A into role B will show speakers with role A has having role B. This can be useful if you have a lot of roles internally that are not intended to be shown to attendees. You can merge them into a role with a name appropriate for your attendees.
When merging the location, track, or role that you are merging into does not have to have any sessions itself. So you can use this to show a different name to attendees than you are using internally. For example you could create a ‘Main Hall’ location, and merge ‘Building B - Hall A’ into that location so attendees see ‘Main Hall’ in their agenda.
How can I embargo content that is not yet ready for the public?
You can choose to embargo session titles and descriptions if you have content that should only be shown to the public after being announced in the event.
An embargo is applied by using labels to identify the sessions that should have an embargoed session title or description.
For example if you have a label ‘New Product Launch’, you can configure an embargo to hide the session title and description from sessions with that label. Following the launch of the product you can remove the embargo and republish the agenda.
If you embargo a session or description you can replace the original text with something to indicate that the session will be published later, for example ‘Super Secret Session’.
The speakers for a session will still be shown when it is embargo’ed. To exclude a session, including it’s speakers from being published then use ‘Session Filters’ rather than an ‘Embargo Content’.
To configure an embargo:
- Click ‘Publish Agenda’
- Click on the name for your existing publication
- Click ‘Configure’
- Expand the ‘Session Configuration’ section
- Expand the ‘Embargo Content’ sections and configure the embargo that you need
- Save and republish
How can I add my own content to the Agenda App?
You can add a ‘Custom Page’ which you can use to show any additional content you would like to share, for example, you might want to include links to the code of conduct policy, or the menu for lunch.
To configure this:
- Navigate into your Agenda App configuration and scroll to the ‘Custom Page’ section
- Change the Custom Page to ‘Enabled’
- Choose an icon and a name for the page. If you need additional icons please ask support
- Add the content you want to show on the page
- Save and publish the agenda
Can I integrate my ExpoFP floor plan?
Yes. To learn more about how to configure this, please follow this link.
You can also push Lineup Ninja sessions into an ExpoFP floor plan via the Expo FP Integration.
How do I share files such as slides and handouts with my attendees?
You can share files attached to Speakers and Sessions with your attendees by using File Types and then choosing to include selected File Types in the app.
Note
‘Image’ and ‘Generic File’ types cannot be shared with attendees. If you require this please contact support.
To configure this:
- Configure/upload your file types
- Navigate into your Agenda App General Configuration and scroll to ‘Which file types do you want to share with attendees?’

- Save and republish your agenda
Uploaded files will appear in the page for the Session or Speaker like this: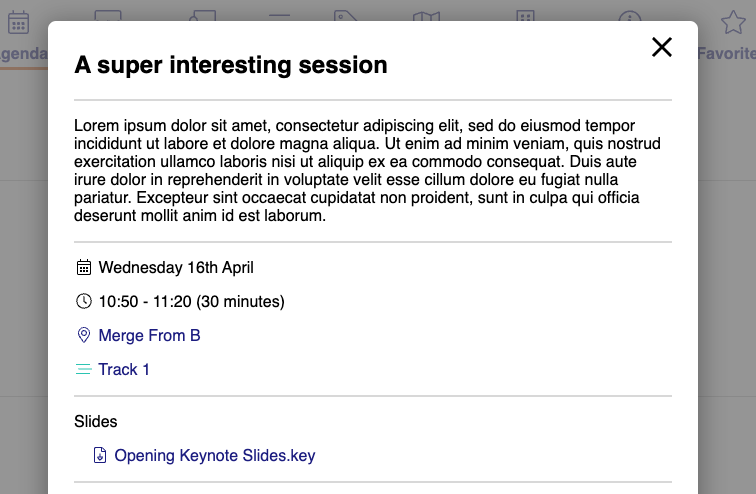
Can I share the speaker’s socials on the Agenda App?
Yes. You can share your speaker’s social media accounts via the Speaker List. To enable this:
- Navigate to >
- Open your Agenda App configuration and scroll to ‘Speaker List Page’
- Edit ‘Do you want to show social links logos on the Speaker List page’ drop down and select ‘Yes, show speaker’s socials’
How do I embed a link in the session pop-up?
You can embed links in text fields such as session descriptions. Here’s a step-by-step guide:
Can I send push notifications via the Lineup Ninja web app?
No, the Lineup Ninja Agenda App doesn’t support push notifications.
Next - Timetable Grid
Still can’t find what you’re looking for? Email support@lineupninja.com and one of the team will get back to you as soon as possible.