Zapier
Lineup Ninja can trigger events in Zapier when you publish your event.
Note
The Zapier integration is currently accessible by invitation only. If you would like to use this integration click this link to activate it in your Zapier account: https://zapier.com/developer/public-invite/171287/74ec77145f9b80891dd1fa37d4919ccf/
What triggers are available and when do they fire?
The following triggers are available:
- Speaker Created
- Speaker Updated
- Session Created
- Session Updated
- Label Created
- Label Updated
- Location Created
- Location Updated
- Resource Created
- Resource Updated
- Track Created
- Track Updated
Triggers fire when you publish your agenda via the ‘Publish Agenda’ page. They do NOT fire as you update your agenda in ‘Agenda Planning’.
This means you can work in ‘Agenda Planning’ until you are ready to publish your changes. When you are ready, you publish the data to Zapier to fire the triggers.
What data is available in the trigger?
In the default configuration the data in the trigger includes the data for the object itself and related data that might be useful in a future step. For example, the data for Speaker Created / Speaker Updated trigger includes the following:
- The speaker’s attributes (First Name, Last Name, Bio etc…)
- The speaker’s sessions. And for each session:
- The session name, description etc
- The session location
- The session tracks, and for each track:
- The track name
- The session labels, and for each label:
- The label name
- The speaker’s labels, and for label:
- The label name
If you do not want to include the related data, you can configure the “Should related data be included” option in the integration configuration.

You can download the Field Schema for each type from these links:
Note
You may see a ’list item’ called ‘Contributors’, this means ‘Speakers’. At the time of writing there is a Zapier but that means our internal naming is shown in the Zapier UI.
What’s the difference between a ‘Created’ and ‘Updated’ trigger?
A ‘Created’ trigger will only fire once, at the time the item is first published. I.e. if you add a new speaker to the agenda, then publish your event, the ‘Speaker Created’ trigger will fire. If you subsequently update the speaker the trigger will not fire again.
An ‘Updated’ trigger will fire when the item is first published and again for any future update. This will result in more ‘Tasks’ running, which may incur extra cost, but will ensure your data is up to date.
Warning
In the default configuration related data is included in the trigger data. This means that an ‘Updated’ trigger may fire more frequently than you expect.
For example:
- You are using the ‘Speaker Updated’ trigger
- ‘Speaker A’ is presenting ‘Session B’ and the description of ‘Session B’ changes
- The ‘Speaker Updated’ trigger will fire because their session description has changed
This is designed to ensure your data is always accurate. If you do not want to include related data set the “Should related data be included” option in the integration configuration.
How do I publish existing data?
Zapier is intended to only process new and updated data. However you probably want to publish all of your event data rather than just new changes, at least initially.
To manage this there is an option in the integration configuration “How should existing data be handled”.

This changes the interaction between Lineup Ninja and Zapier at the point where you turn the Zap on.
When you turn on a Zap, Zapier asks Lineup Ninja if there is any existing data. It takes the response from Lineup Ninja and considers everything received as ‘old’ and will not trigger Zaps for this data.
To publish all content Lineup Ninja can return an empty response in this initial response. This will cause Zapier to consider all of your event data as ’new’ and will trigger Zaps for all of it. See the Zapier Documentation for more details.
- If ‘Zaps will fire for all existing data’ is set then Lineup Ninja will tell Zapier there is no existing data and Zaps will fire for all data
- If ‘Existing published data is ignored’ is set then Lineup Ninja will tell Zapier that currently published data should be considered as ‘old’ and it will not trigger Zaps. New / Updated content will trigger Zaps (depending on the trigger used).
Warning
When this option is set to ‘Zaps will fire for all existing data’, Zaps will trigger for every item every time you turn your Zap on. If you do not want to receive Zaps for all data when turning your Zap on you should change the option to ‘Existing published data is ignored’ before turning your Zap on.
You may want to change this setting to ‘Existing published data is ignored’ after your first main data import.
What data is used for sample / test data?
By default the integration will use pre-defined sample data when you create a new Zap. This is intended to ensure you can use example data for all properties that are available in the trigger.
If you would prefer to use your real event data then change the “What data should be used for testing Zaps” setting in the integration configuration.
You can download the sample data for each type from these links:
What’s the difference between ‘Zapier Id’, ‘Lineup Ninja Id’ and ‘Lineup Ninja Short Id’?
In the trigger you will find each object has two identifiers
- ‘id’ or ‘Zapier Id’ - This identifier is used to ensure the ‘Updated’ Zapier triggers fire. It changes when the data changes. You should not use this identifier in a following step.
- ’lineupNinjaId’ or ‘Lineup Ninja Id’ - This is a fixed identifier and does not change. You should use this identifier if you need a consistent identifier in your following steps.
- ’lineupNinjaShortId’ or ‘Lineup Ninja Short Id’ - This is the first 8 characters of the UUID for the object. It can use used when a full UUID is too long to fit into a subsequent step
Create the integration
Creating a Zapier integration requires configuration on both the Lineup Ninja and Zapier sides.
Start in Lineup Ninja by following these steps:
- Navigate to >
- Scroll down to ‘Zapier’ and press ‘Integrate’
- In the configuration that is displayed you can set some options for how the data is shared with Zapier. You can start with the defaults, but please do read all of the documentation because these options affect the number of Zapier Tasks that will be used, which will have cost implications for you:
- Click ‘Save’
- Click ‘Publish’
- You will now see a table containing ‘Username’, ‘Password, ‘Team Id’ and ‘Publication Id’.
You are now ready to configure Zapier:
- Open Zapier in a new tab.
- Create a new Zap
- For trigger choose ‘Lineup Ninja - Agenda Publishing’
- Choose the event you are interested in
- Click continue
- Click ‘Connect’ to connect to Lineup Ninja. A pop-up window will appear, if you do not see it then turn off any pop-up blockers. Input the information from the integration you created in Lineup Ninja. If you hover over each field in Lineup Ninja you can click it to copy it to your clipboard.
- Username - This is always
zapier. - Password - This is unique to Zapier. It is not your login password.
- Team Id
- Publication Id
- Username - This is always
- Zapier will then confirm your credentials and you can proceed to add the actions you need.
Publishing your schedule
To publish your schedule just click the ‘Publish’ button!
How long does it take for Zaps to fire?
Zapier looks for new data in your Lineup Ninja event on a regular schedule. The frequency depends on your Zapier package and ranges between 1 and 15 minutes.
How do I use ‘related data’ in a Zap?
As explained above, the data available in the trigger contains related data that might be useful. For example, a ‘Speaker’ contains ‘List Items’ containing the details for each of their sessions.
How you use this data depends on the action you will use. Some actions support ‘List Items’ natively and you will be able to pass the data in the ‘List Item’ directly to the action.
Some actions do not support ‘List Items’. In this instance you can use the ‘Looping By Zapier’ action to run an action once for each item in a list.
Note
Using loops will use extra ‘Tasks’. Please consult the Zapier Documentation
For example, if you want to trigger an action for each Session a Speaker is presenting you can add a ‘Looping By Zapier’ step, and choose the ‘Line Items’ option. Then you can choose the fields from the related data you want to make available in the next step.
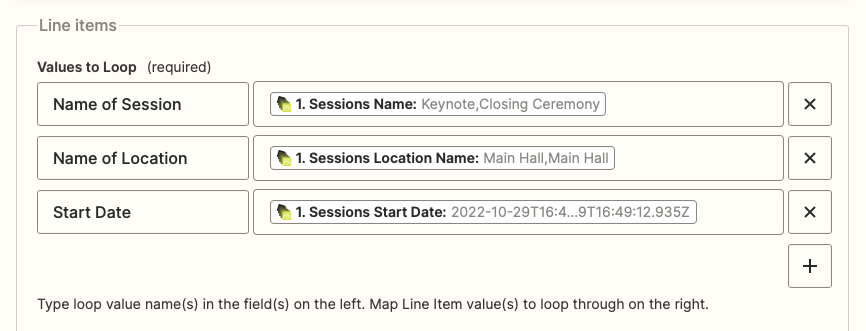
Then in a subsequent step you can choose data from the original ‘Speaker’ data in step 1, and the ‘Session’ data from the looping step. For example:

In this subsequent step it is important not to accidentally pick the ‘Preview Loop Values’ data as this data is only shown when building a Zap, it is not available when it runs. You need to click ‘Show All Options’ and choose the field with the name you configured in the looping step.
You can find more information about ‘Looping By Zapier’ in the Zapier Documentation.
Can I create multiple Zapier integrations?
Yes you can create multiple Zapier integrations. Some reasons you might want to do this:
- To trigger Zaps at different times. For example you might want to publish some changes to Zaps every day, and to some other Zaps once per week.
- To send different content to different Zaps. You can do this by applying different ‘Session’ and ‘Speaker’ filters to each integration.
How do Speaker Profile Photos work?
If an ‘Speaker Profile Photo’ has been uploaded for a Speaker it will be available in 4 fields.
- Profile Picture URL - 128x128
- Profile Picture File - 128x128
- Profile Picture URL - 256x256
- Profile Picture File - 256x256
There are two different sizes available, 128x128 and 256x256 and you can choose between a ‘File’ and a ‘URL’.
The choice between a ‘File’ and a ‘URL’ depends on the action you are using. If the action expects a File then choose the ‘File’ option, otherwise the ‘URL’ option will normally suffice.
How do I use Custom Field data?
You can add Custom Fields to your event. These will be available in the Zapier feed.
The object has a ‘Custom Fields’ list item that contains one row per custom field that has a value set for that object.
For example a Speaker may have multiple items in ‘Custom Field Data’ eg
Custom Field Data - Field Name: 'Number of Hotel Nights'
Custom Field Data - Field Type: number
Custom Field Data - Field Value: 3
and
Custom Field Data - Field Name: 'Short Bio'
Custom Field Data - Field Type: text
Custom Field Data - Field Value: 'Super great presenter'
If you need to extract the data for a specific field you can use the ‘Formatter’ action in Zapier. A full guide is available here. In short you can do this:
- Add ‘Formatter By Zapier’ action
- Choose ‘Text’ as event type
- Choose ‘Spreadsheet-Style Formula’ for the transform
- Then use this formula, replacing “Test Field” with the name of the Custom Field you want to use. See this guide for an explanation of how this works.

- The data is then available for use in subsequent steps.
How can I filter the published content?
You can filter which Speakers and Sessions will be published based on a number of criteria. Some common use cases for filters are:
- Preventing ‘Placeholder’ sessions from being published
- Holding back a Speaker who is not yet ready to be announced
- Excluding sessions scheduled during the ‘build up’ day for the event
- Only publishing speakers who have confirmed their slot
- Removing a particular location, or track from the published schedule
- Anything you can think of using labels!
For Speakers you can filter in 3 ways
- Choose which speakers are to be published based on their relationship to sessions
- (If Speaker Confirmation is enabled): Publish speakers that have a confirmed session that is published and not filtered out.
- Publish speakers that are speaking on any session that is published and not filtered out.
- Publish all speakers
- Publish no speakers
- Apply more granular filters with labels
- Only publish speakers with a particular label. For example you might want to use a ‘Content Reviewed’ label to flag speakers that have had their content reviewed.
- Exclude speakers with a particular label. For example you might want to exclude a ‘Do not publish’ label to prevent publishing of speakers who are not yet ready to be published.
For Sessions you can filter in numerous ways
- Choose which sessions are to be published based on their relationship to speakers
- Publish All Scheduled Sessions. Publishes sessions regardless of whether they have confirmed speakers or not.
- (If Speaker Confirmation is enabled): Publish sessions that have one confirmed speaker.
- (If Speaker Confirmation is enabled): Publish sessions that have all their speakers confirmed.
- Publish All Sessions (available on Lineup Ninja Agenda App only)
- Apply filters with labels
- Only publish sessions with a particular label. For example you might want to use a ‘Content Reviewed’ label to flag sessions that have had their content reviewed.
- Exclude session with a particular label. For example you might want to exclude a ‘Placeholder’ label to prevent publishing of sessions which are not yet populated.
- Filter by location
- Only publish sessions in a particular location, or locations. This can be useful if you are publishing an agenda for just one or two locations.
- Exclude sessions in a particular location, or locations. This can be useful if you have scheduled sessions in your Green Room or similar back stage location.
- Filter by resource
- Only publish sessions needing a particular resource. This could be useful if you are producing an agenda for a particular team that manages some resources.
- Exclude sessions needing a particular resource.
- Filter by Date
- Only publish sessions in a date or dates. Useful if you are producing an agenda for a particular day.
- You can exclude a date or dates from your publication. Useful if you have dates for build up and tear down in your agenda.
- Filter by Track
- Only publish sessions in a particular track or tracks. Useful if you are producing separate agenda for separate parts of your event
- Exclude sessions on a particular track. Can be useful to block presenting of a track until a product launch has happened.
To configure filters:
- Click ‘Publish Agenda’
- Click on the name for your existing publication
- Click ‘Configure’
- Expand either the ‘Speaker Configuration’ or ‘Session Configuration’ section
- Expand the corresponding ‘Filter Speakers’ or ‘Filter Sessions’ sections and configure the filters you need
- Save and republish
How can I merge locations and tracks when publishing?
When publishing you can merge content together. This enables you to publish a simpler agenda for your attendees than the one you are using to plan your event.
You can choose to merge these types of data:
- Locations. Merging location A into location B will show all sessions in location A as taking place in location B. This can be useful if you have multiple locations configured for scheduling purposes that will be experienced by the attendee as a single location.
- Tracks. Merging track A into track B will show all sessions in track A as being in track B. This can be useful if you have some tracks with only a small number of sessions and wish to present this sessions as being in a more populous track.
When merging the location, or track that you are merging into does not have to have any sessions itself. So you can use this to show a different name to attendees than you are using internally. For example you could create a ‘Main Hall’ location, and merge ‘Building B - Hall A’ into that location so attendees see ‘Main Hall’ in their agenda.
How can I embargo content that is not yet ready for the public?
You can choose to embargo session titles and descriptions if you have content that should only be shown to the public after being announced in the event.
An embargo is applied by using labels to identify the sessions that should have an embargoed session title or description.
For example if you have a label ‘New Product Launch’, you can configure an embargo to hide the session title and description from sessions with that label. Following the launch of the product you can remove the embargo and republish the agenda.
If you embargo a session or description you can replace the original text with something to indicate that the session will be published later, for example ‘Super Secret Session’.
The speakers for a session will still be shown when it is embargo’ed. To exclude a session, including it’s speakers from being published then use ‘Session Filters’ rather than an ‘Embargo Content’.
To configure an embargo:
- Click ‘Publish Agenda’
- Click on the name for your existing publication
- Click ‘Configure’
- Expand the ‘Session Configuration’ section
- Expand the ‘Embargo Content’ sections and configure the embargo that you need
- Save and republish
How can I publish automatically?
Warning
Consider your teams workflow as a team before enabling automatic publishing. When you enable automatic publishing there is a potential for the agenda to be published when you have content that is not ready for publication.
To schedule publishing scroll down to the ‘Scheduled Publishing’ part of the configuration.
You can then choose whether to publish once per hour, or once per day. If you choose to publish each day the publication will occur around 3am in the timezone of your event.
Still can’t find what you’re looking for? Email support@lineupninja.com and one of the team will get back to you as soon as possible.