Agenda Planning Board
What is the Agenda Planning Board?
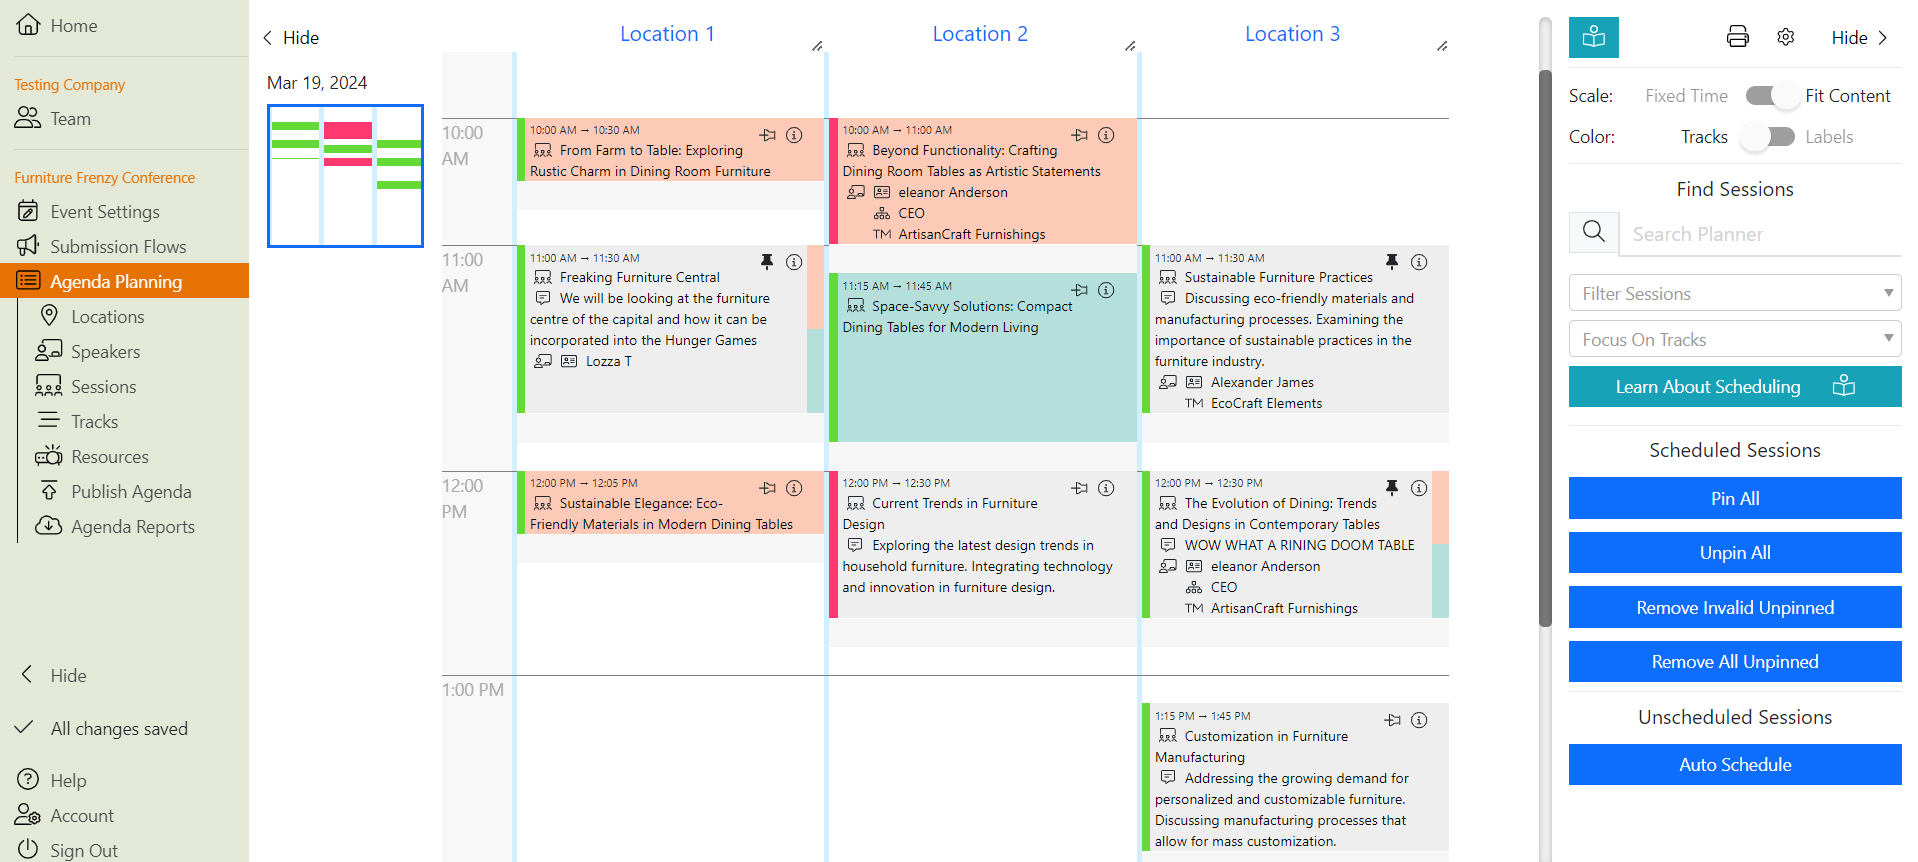
Your Agenda Planning Board is where you will schedule your sessions and breaks. There are many features to assist with planning your schedule and the board view can be configured for easy viewing.
How do I set up an empty planning board?
Once you have configured your Event Date(s) and Locations for your event, an Agenda Planning Board will appear. From here you can edit the Locations’ availability by clicking the Location name, and, when you have sessions, schedule them to times and locations.
How do I set the default session duration?
- Navigate to >
- Scroll to the bottom of the list view
- Edit ‘Default Duration’ to set a default session duration
All sessions that are created will have this duration unless they are configured otherwise (for example, if you asked submitters to specify the session duration in the Submission Flow).
How do I set the default session changeover time in between sessions?
- Navigate to >
- Scroll to the bottom of the list view
- Edit ‘Default Changeover Time’ to set the default amount of time in between sessions
How do I add breaks to the agenda?
- Navigate to >
- Select all of the locations that you want to add a break to using the tick box on the left hand side
- Scroll to the ‘Actions’ drop-down menu at the bottom on the page and choose ‘Make unavailable (add breaks)’
- Choose the date(s) to update and the start/end time of the break
- Click ‘Make Unavailable (add a break)’
- Repeat for all subsequent breaks
Planning Board View
How can I view more data in the Agenda Planning Board view?
There are multiple ways that you can use to view more data on the Agenda Planning Board.
1. You can use the ‘hide’ controls to hide various elements of the Agenda Planning view: 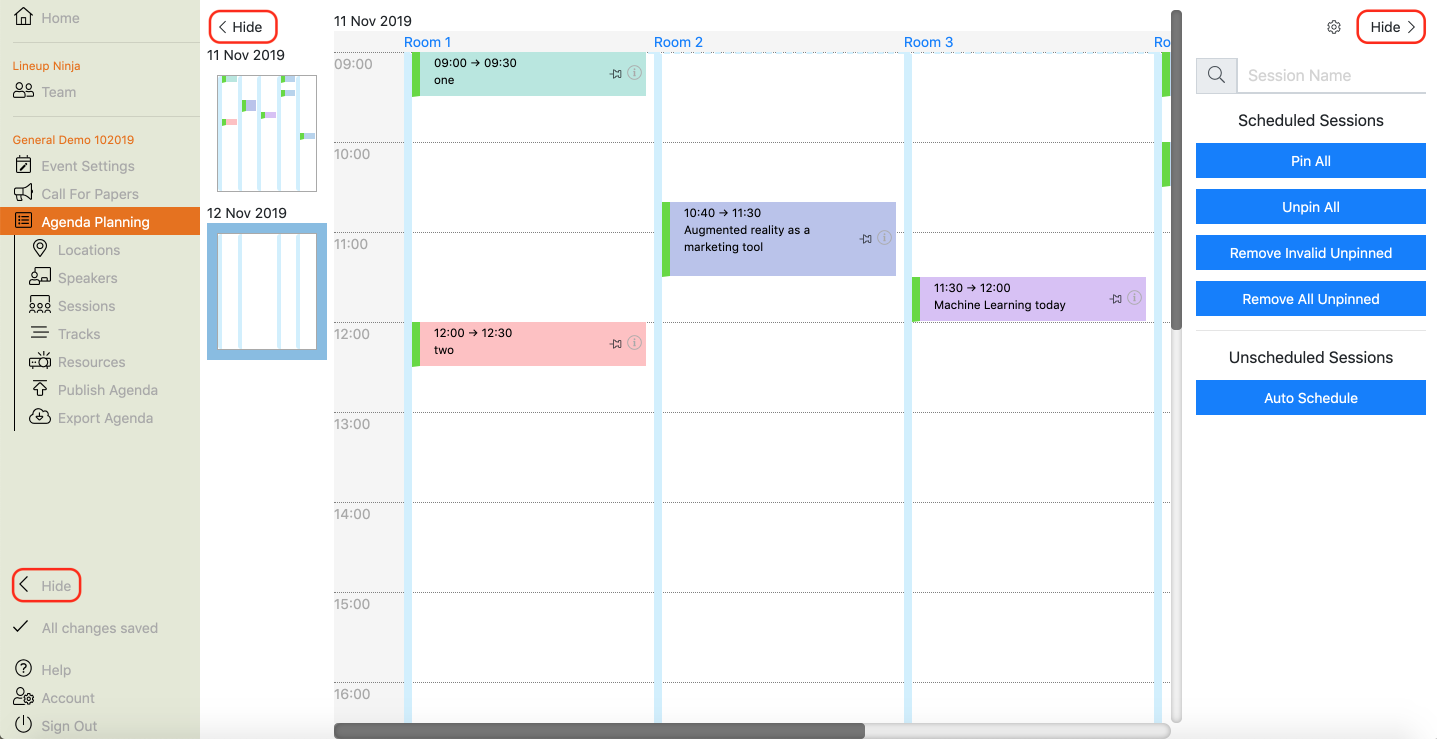
This will give you more screen space to see your agenda. The show/hide controls are minimized, but they’re still available.
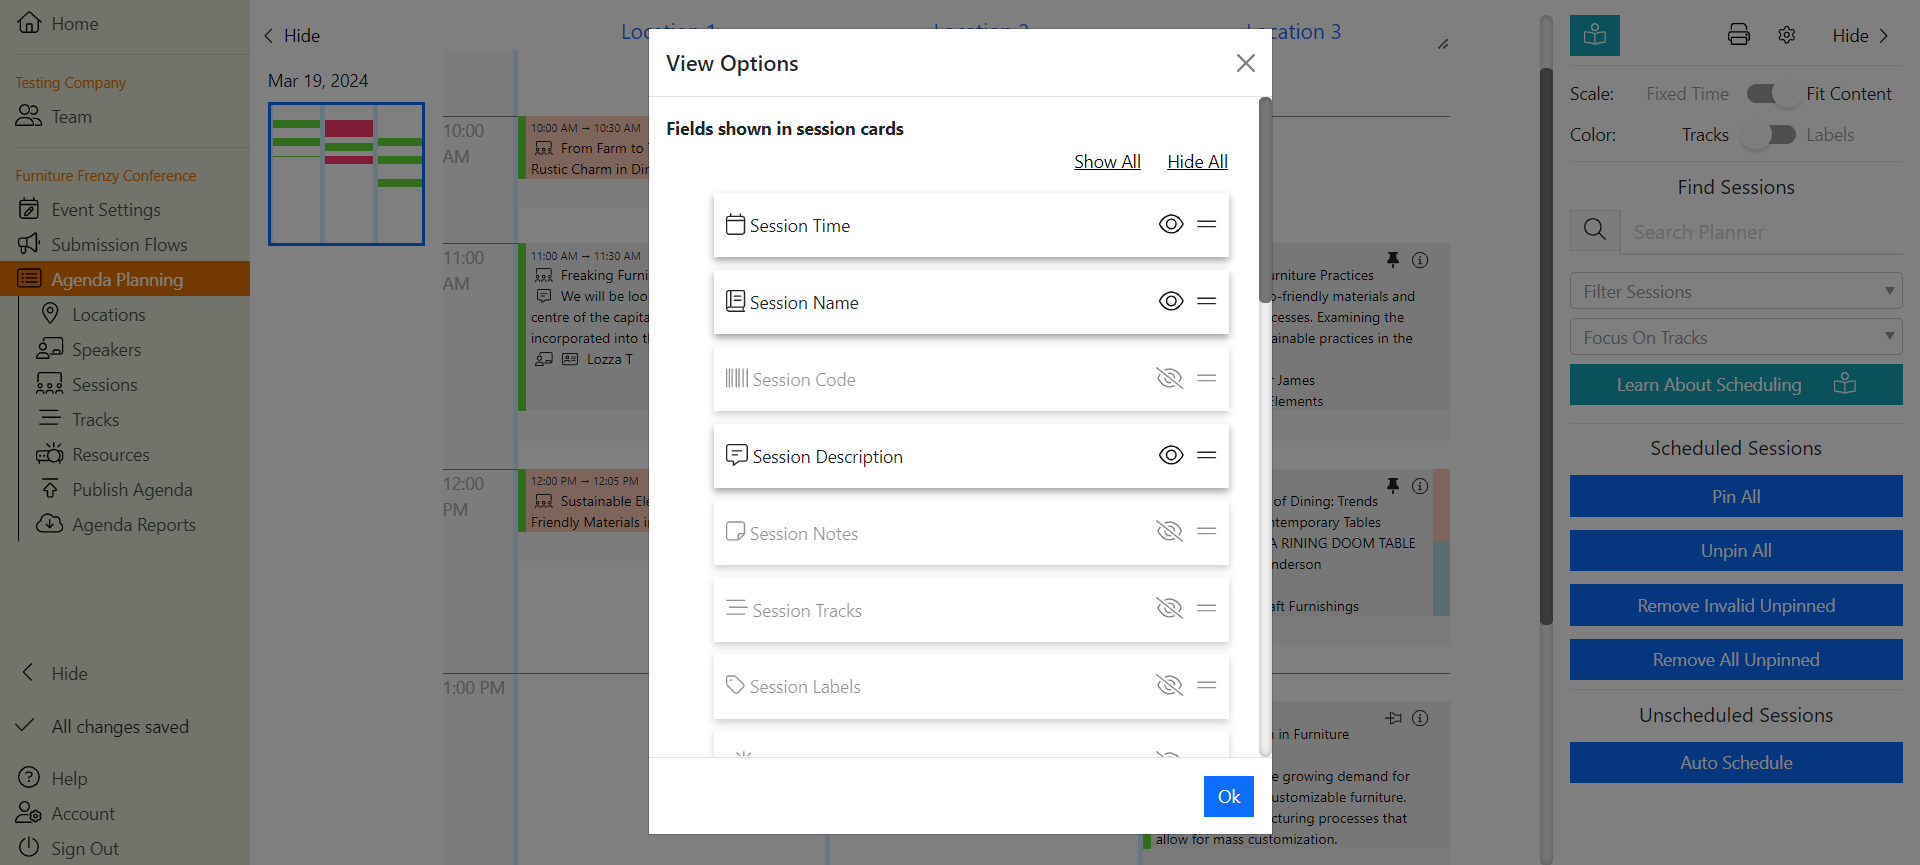
2. Click on in the top right-hand corner of the Agenda Planning Board view to open the ‘View Options’ pop-up. Here, you can show/hide the Session and Speaker fields that are visible on the session cards on the board.
3. Click on in the top right-hand corner of the Agenda Planning Board view to open the ‘View Options’ pop-up. Adjust the ‘Zoom the agenda vertically’ slider to allow more/less room per session. This is particularly useful when you have many shorter sessions per hour.

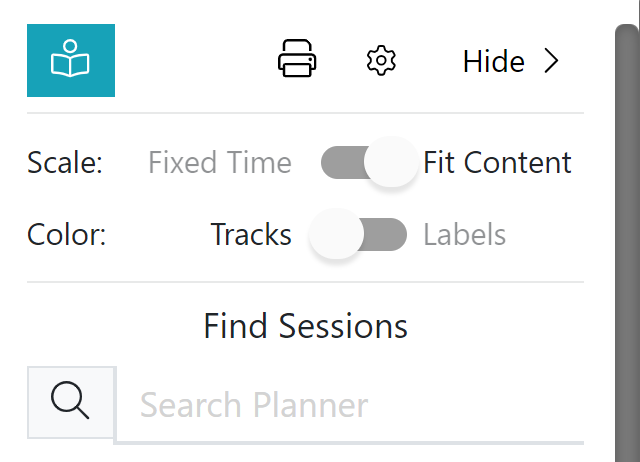
What is the difference between the Fixed Time vs Fit Content mode toggle?
The mode toggle allows you to change the view of your Agenda Planning Board depending on whether you want to have fixed time spaces or if you want to expand/contract the time to fit the content.
Fixed Time = Fixed Time is the default Agenda Planning Board setting. This is where the gaps in which you can schedule content remains the same size, regardless of the content that has been configured to appear in there. You will see a scroll bar on the right hand side of each session that allows you to view the content by scrolling.
Fit Content = Fit Content expands the scheduled session to fit the content that you have configured to appear there. This means you will always be able to view exactly the data you need to, without clicking into the session.

To change between these views, navigate to your Agenda Planning Board and toggle Fixed Time / Fit Content in the top right hand corner of the screen.
How can I tidy up the view of my Agenda Planning board?
There are several ways that you can reduce the amount of information that appears on the session blocks, all of which are configured by clicking on the settings wheel:
-
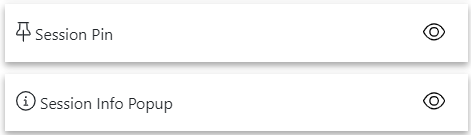
Remove pin/info icons - Under ‘Fields showing in session cards’, you can show/hide the pin and if icon by clicking on the eye
-
Remove field icons on sessions - Toggle on/off ‘Show icons on sessions’

-
Remove scrolling bars - Toggle on/off ‘Show vertical scroll bars on sessions’

Can I make my locations narrower, so that I can fit more of them on the screen?
To adjust the width of a Location, use the drag handles next to the Location name to make it wider or narrower.
You can reset the widths in the Agenda Planning Board settings.
How do I search in the Agenda Planning Board view?
In the Agenda Planning Board view, there is a search tool in the top-right corner of the screen. You can search all displayed text within the Agenda Planning Board, including Speaker and Session data, Custom Fields, Labels, Resources and Tracks.
When you enter a search term, two things happen:
- Scheduled sessions that match the search term remain unchanged; sessions that do NOT match are greyed out
- Unscheduled sessions that do match the search term remain unchanged, unscheduled sessions that do NOT match the search term are hidden from the list
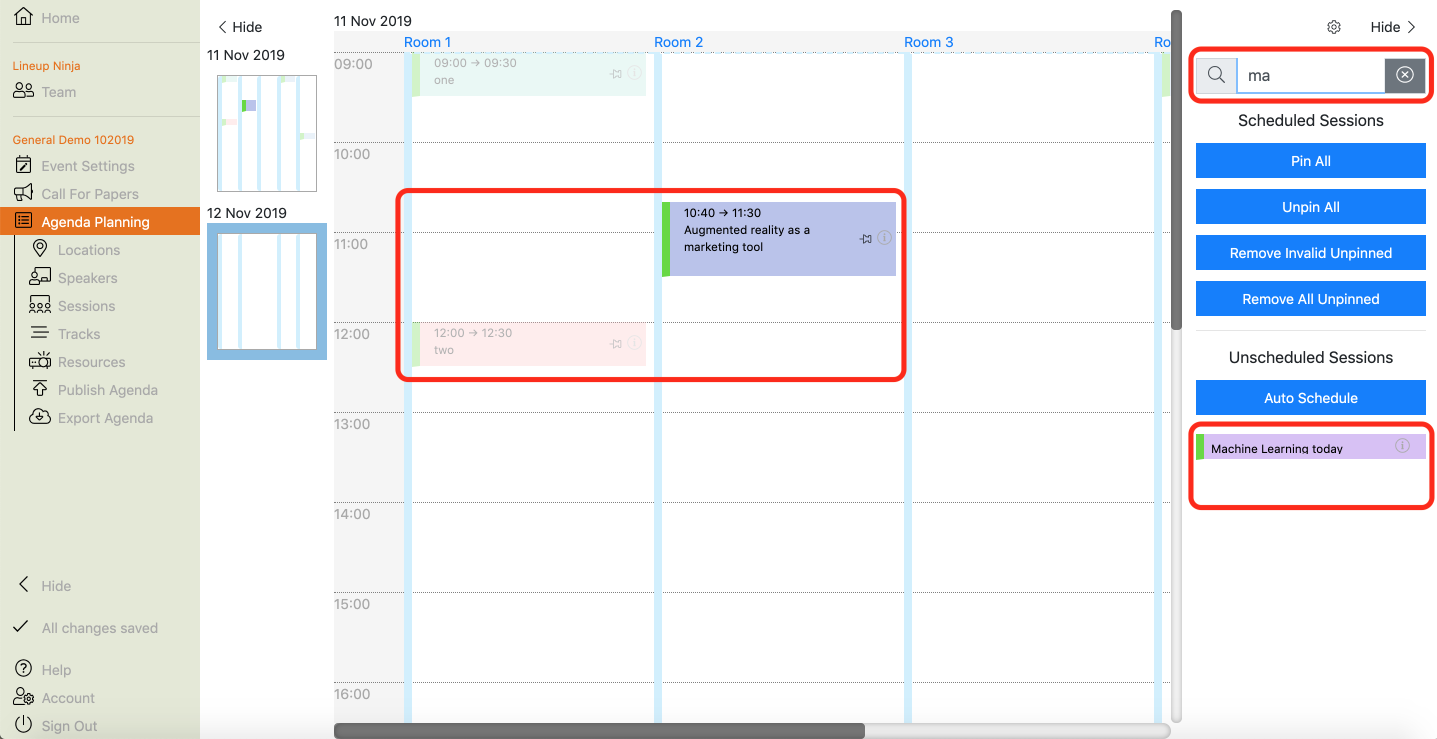 To clear the search, either delete the text in the search box or click on
at the right-hand side of the search box.
To clear the search, either delete the text in the search box or click on
at the right-hand side of the search box.
Is there a way to reorder the Locations as they appear on the Agenda Planning Board?
- In the Agenda Planning Board view, click on in the top right-hand corner.
- This will bring up a ‘View Options’ pop-up, in which you can use the to reorder the list
- Click ‘Ok’
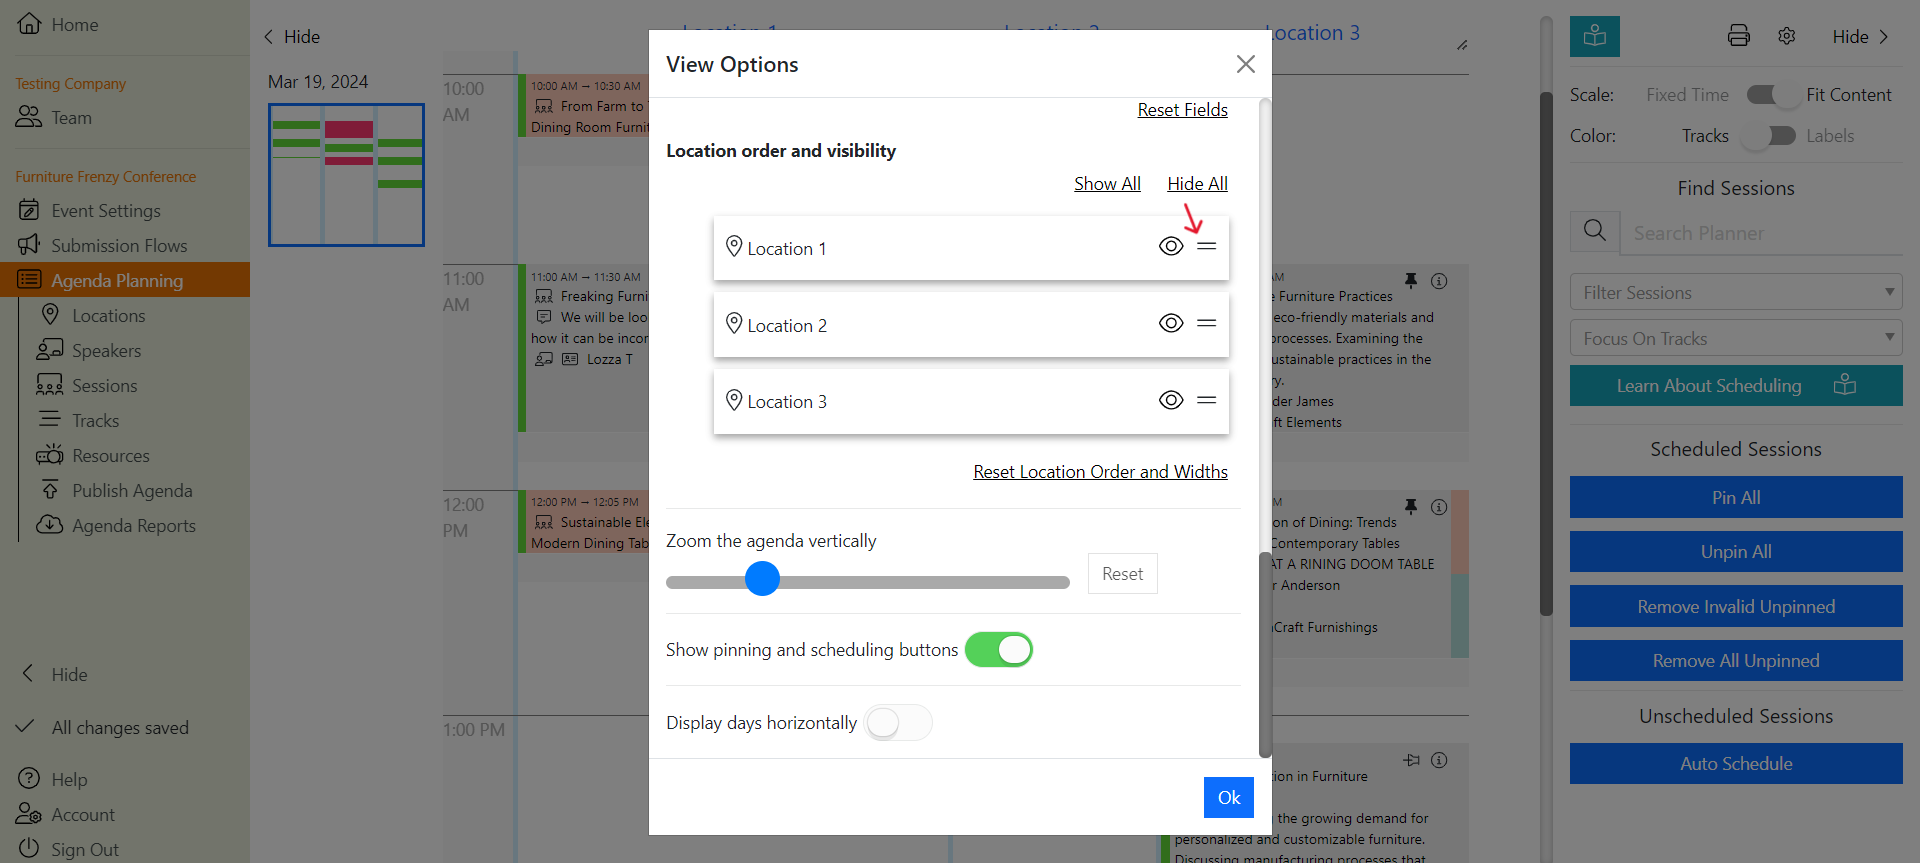
How do I hide certain Locations in the Planning Board view while I’m not working on them?
- In the Agenda Planning Board, click on in the top right-hand corner.
- This will bring up a ‘View Options’ pop-up, in which you use the eye icon to show/hide certain Locations
- Click ‘Ok’

How do I print my Agenda?
For more information on printing you Agenda, please follow this link.
Stripes
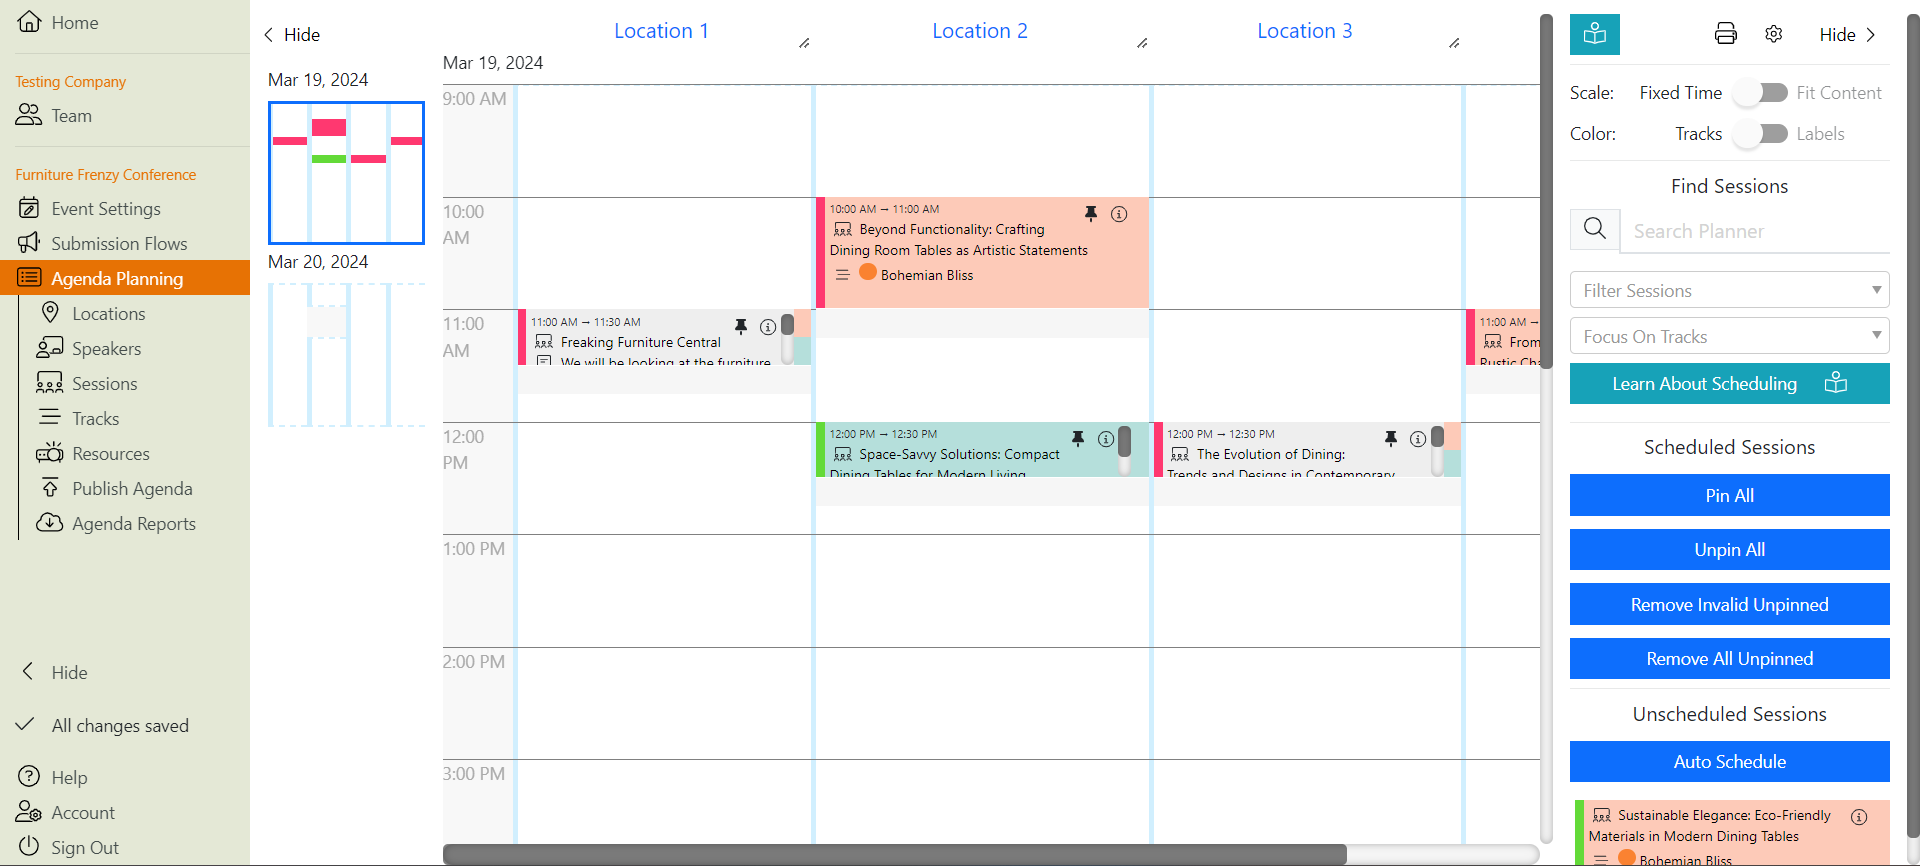
What do the coloured stripes mean down the side of my planned sessions?
The colored stripe down the side of planned sessions indicates the session’s status:
- Green: The session has been scheduled for a time and location and all of its planning constraints have been met. Everything is OK!
- Red: The session has been planned but at least one of its planning constraints has not been met. The session needs some attention
- Amber: The session has been scheduled for a time and location and all of its planning constraints have been met. However, the speaker has not confirmed that they can present at the scheduled time and location yet
Info
Depending on which version of Lineup Ninja you are using, Speaker Confirmation will live in one of two places. For more information, please follow this link.
If your Speaker Confirmation is disabled, planned sessions will only be displayed as green and red.
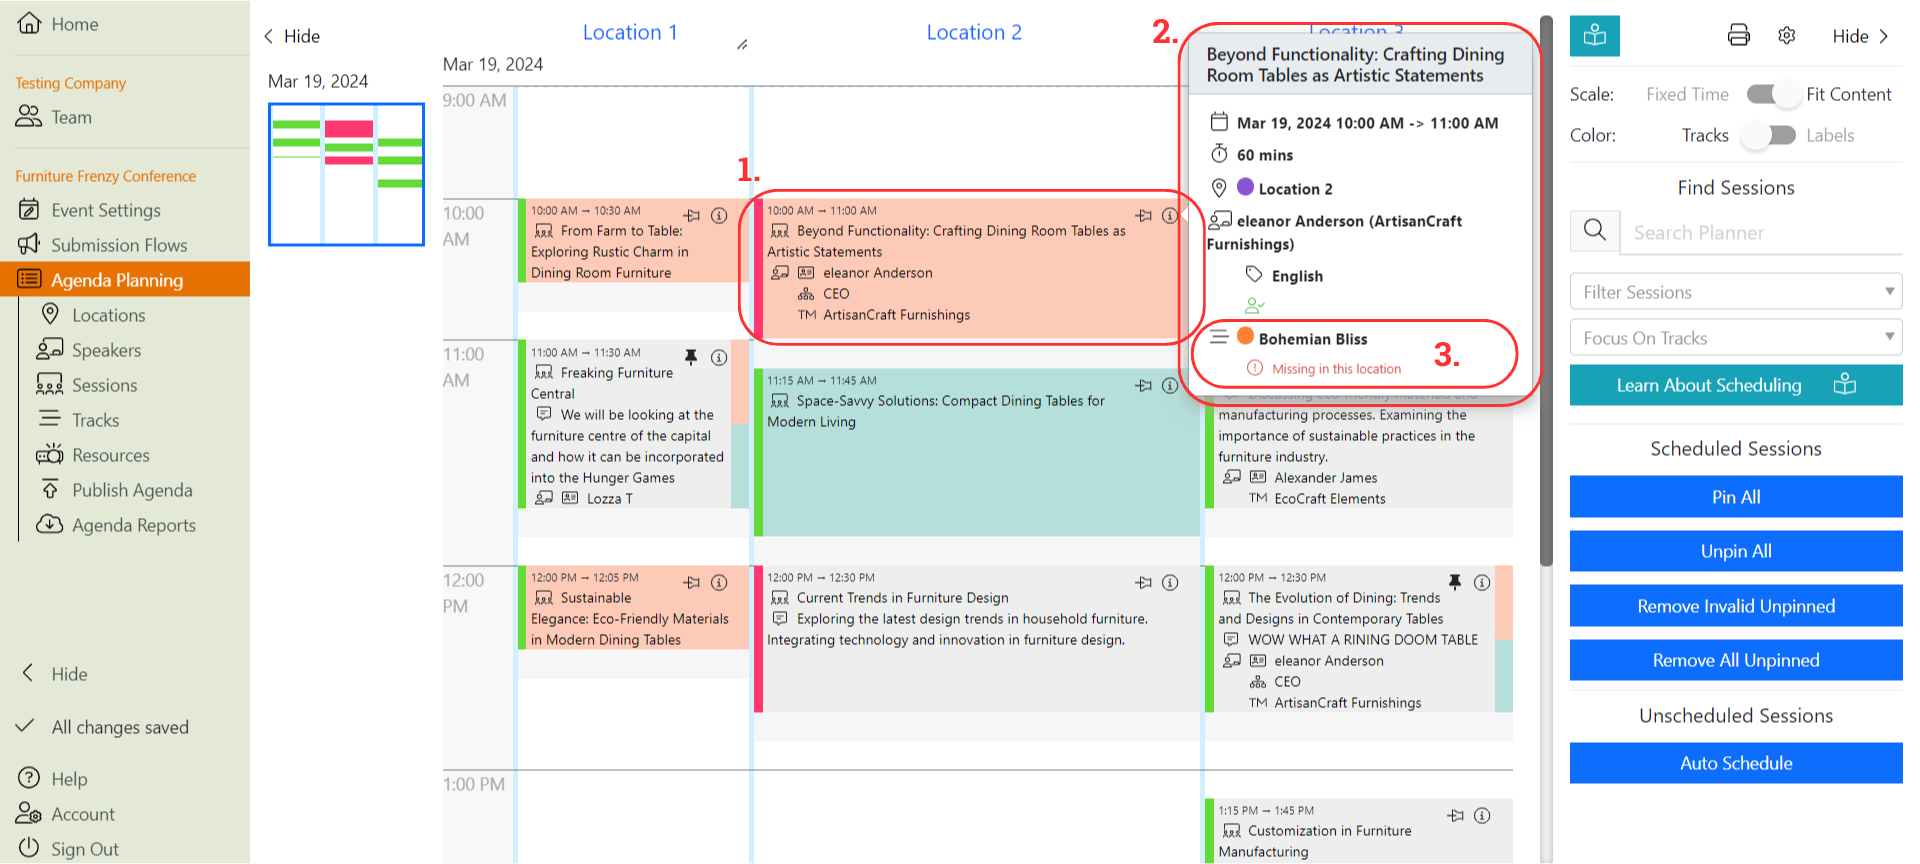
How do I see what the problem is with sessions that have a red stripe down the side?
- Hover over the Info Icon in the red session in question
- This will bring up an information pop-up, giving details about the session.
- Planning constraints that are not met will be displayed with a red info icon. In the below example, the Location does not have the Track associated with that Session.
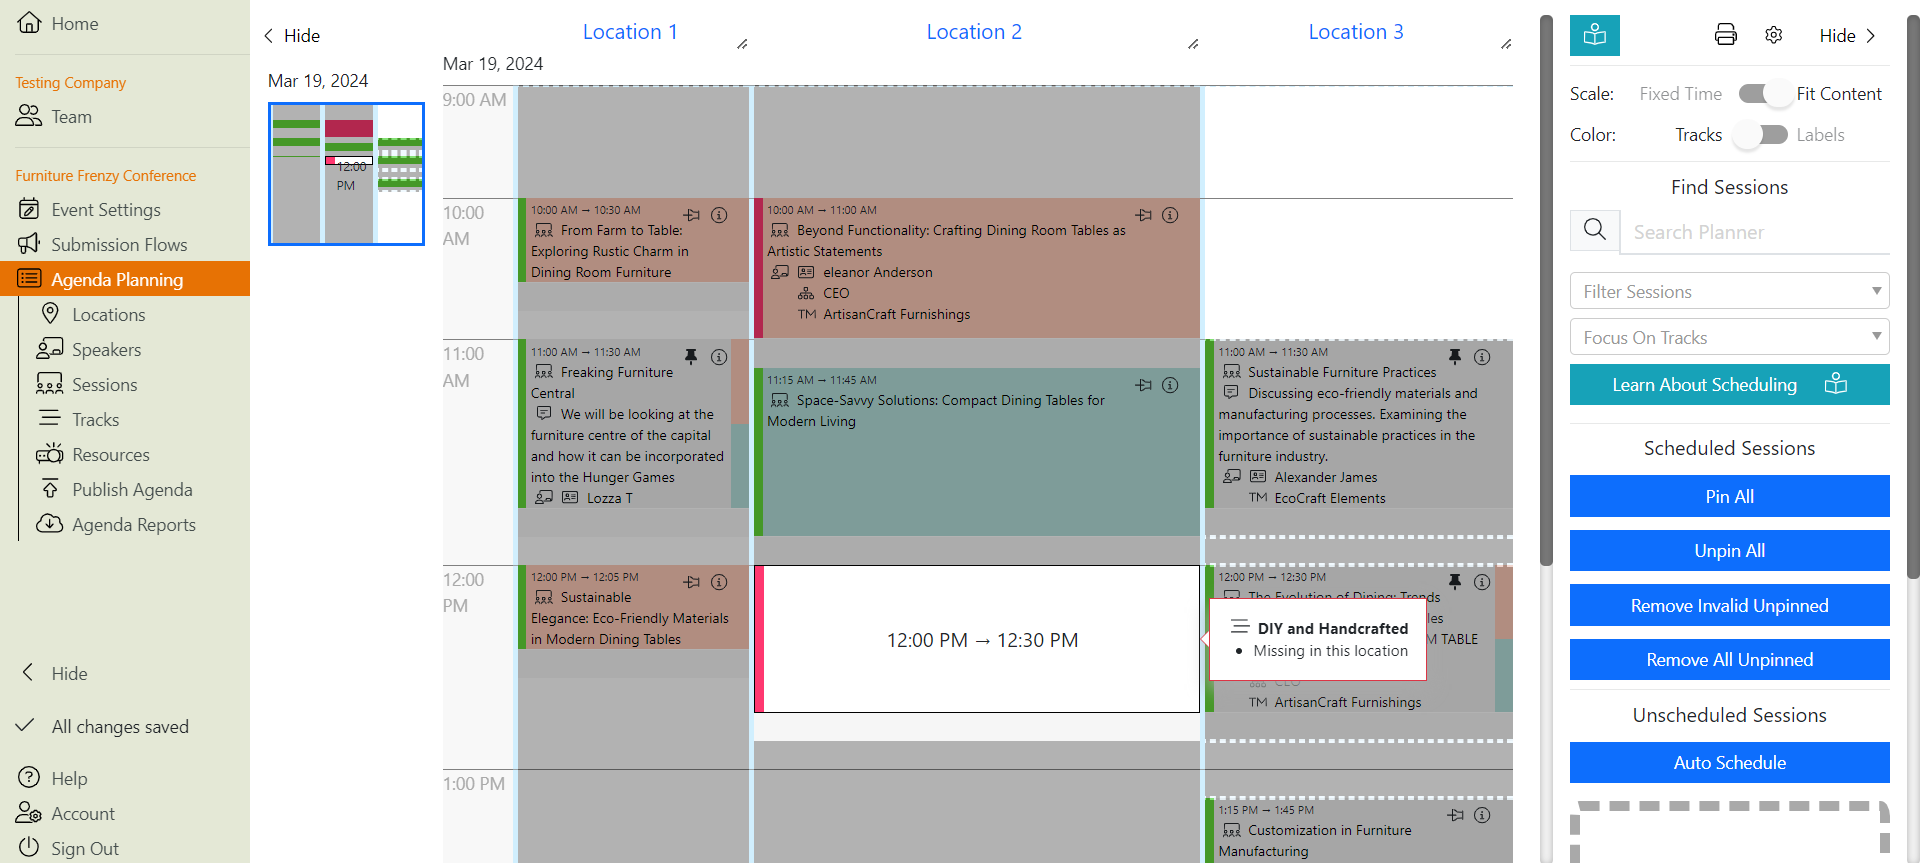
Why do some times/Locations become greyed out when I drag a Session over them?
As you pick up a Session to drag and drop it onto the board, Lineup Ninja evaluates that Session’s planning constraints. It greys out times and Locations that are not valid for that session.
If you hold the Session over an invalid time, it will display the reason(s) why that session cannot be allocated to that time.
Agenda Planning Board Menu Bar
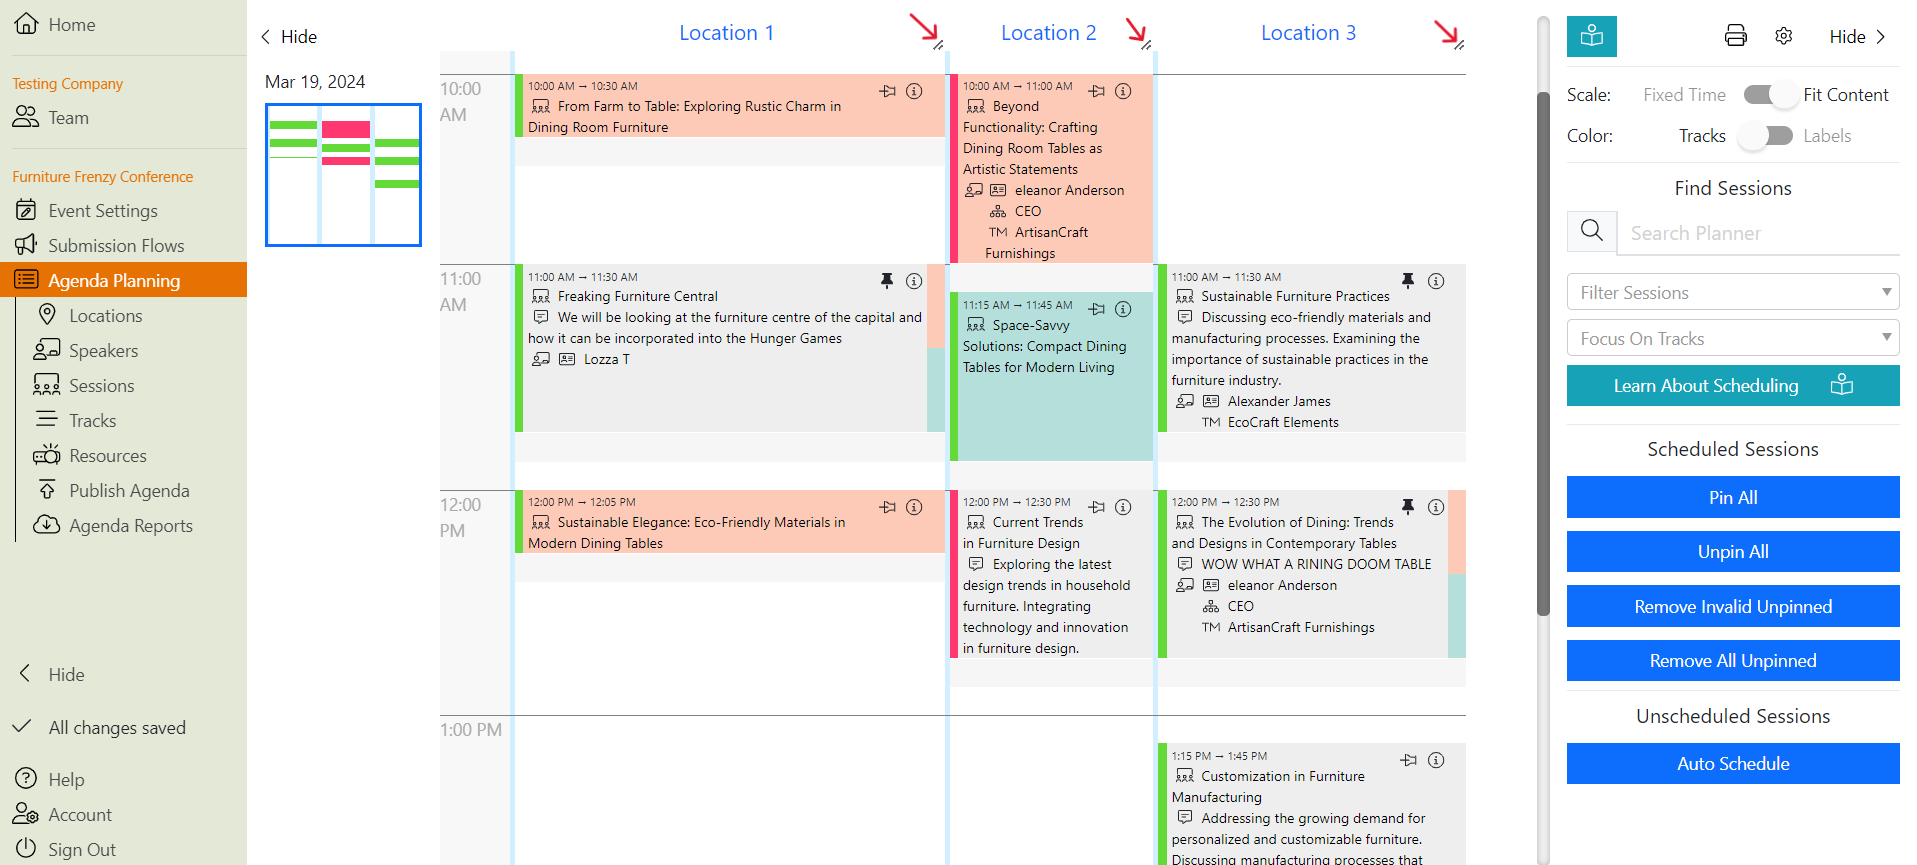
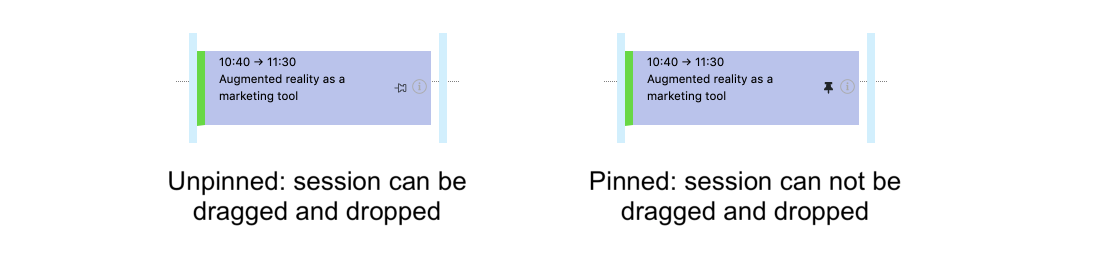
What does the pin/thumbtack icon on planned sessions do?
The on planned sessions allows you to pin sessions to the board so that they can’t be picked up, dragged and dropped.
Tip
Pinning sessions is useful if you are absolutely sure a session will take place in that location and at that time, and don’t want it to be changed easily (or accidentally). Examples of when you would use session pinning include: opening welcome address and closing plenary or sponsored sessions where sponsors have paid for a specific time slot in a particular location.
What does ‘Pin All’ mean?
‘Pin All’ pins all the currently scheduled sessions to the board, so they can’t be easily or accidentally changed to different times/locations.
Tip
This is uesful when you’re happy with your agenda and don’t want someone else in the team to come along and start messing with it!
What does ‘Unpin All’ mean?
‘Unpin All’ unpins all of the currently scheduled sessions, so they can be easily moved around.
What does the ‘Remove Invalid Unpinned’ button do?
The ‘Remove Invalid Unpinned’ button moves all sessions that are unpinned AND invalid (i.e. they have a red stripe down the left-hand side) from the planning board and onto the Unscheduled Sessions list.
This moves all sessions that are unpinned AND invalid (i.e. they have a red stripe down the left-hand side) from the planning board onto the Unscheduled Sessions list.
What does the ‘Remove All Unpinned’ button do?
This moves all sessions (valid and invalid, or green, amber and red) that are unpinned from the planning board onto the Unscheduled Sessions list.
What does the ‘Auto Schedule’ button do?
Auto Schedule will go through the list of Unscheduled Sessions and try to find valid times and locations for each one.
Tip
Auto scheduling your entire agenda is quick, but you might want to review the results before publishing it! We recommend using it with session pinning to build your agenda iteratively.
What can I use Labels for in the Agenda Planning Board?
Labels are a way to group, categorize, or tag, items in your event. You can apply Labels to all your event data, such as speakers, sessions, locations etc. You can also use Labels to unlock extra scheduling power and workflow management in Lineup Ninja. Check out the Labels documentation for details.
Next: Scheduling
Still can’t find what you’re looking for? Submit your question here and one of the team will get back to you as soon as possible.