Entegy
Lineup Ninja can publish your agenda in Entegy
Create the integration
In you Lineup Ninja event, navigate to > and then click the ‘Integrate’ button under ‘Entegy’. This will create a new integration.
A dialog will be displayed, compete the requested fields:
Project ID
In the Entegy interface
- Navigate into your event
- Click ‘Project Settings’
- Click ‘API Keys’
- Copy the ‘Project ID’ into this field in Lineup Ninja
API Key
On the same page as the Project ID
- Click the plus button to create an API key
- Ensure ‘Add/Update Content’ and ‘View Content’ are ticked
- Create the API key and note the key and secret
API Secret
Input the secret generated in the previous step
Entegy Region
Choose the region where your Entegy service has been configured.
Publishing your schedule
To publish your schedule just click the ‘Publish’ button!
Please note that the first publication may take a long time, potentially upwards of an hour if your event is very large. Please be patient.
Future updates will be much faster.
How are Room and Streams handled?
Lineup Ninja Locations map to Entegy Rooms. The integration will automatically create the Rooms in Entegy.
Similarly Lineup Ninja Tracks map to Entegy Streams. The integration will automatically create the Streams in Entegy.
Entegy only supports one Stream per Session. If you have sessions with multiple Tracks, the integration will choose the first Track alphabetically.
Can I add Categories to Sessions?
Yes, you can map Lineup Ninja Labels to Categories in Entegy.
To do this create a Label in Lineup Ninja with exactly the same name as a Sub Category in Entegy. Then add this Label to the Sessions you wish to receive the Sub Category.
Then in the configuration navigate to ‘Session Configuration’ and choose ‘Yes’ for ‘Should Entegy Session Categories be managed by Lineup Ninja?’
Then select the Labels you want to map over to Sub Categories.
How do Speaker Roles map to Entegy?
You can map Lineup Ninja Speaker Roles to Entegy Speaker Roles. To do this you need to set up the mapping.
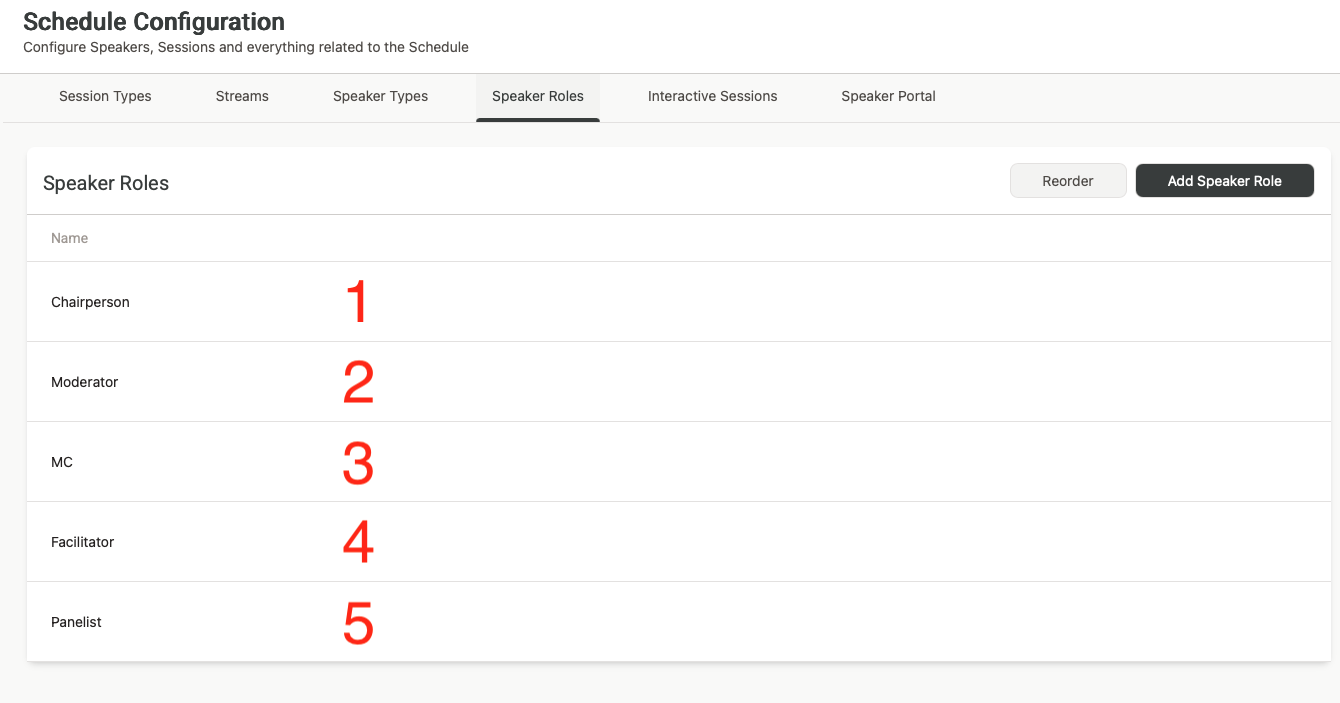
In Entegy navigate to Schedule / Schedule Configuration / Speaker Roles.
Then note the position of each Speaker Role. The first item in the list is position 1, and so on. For example:
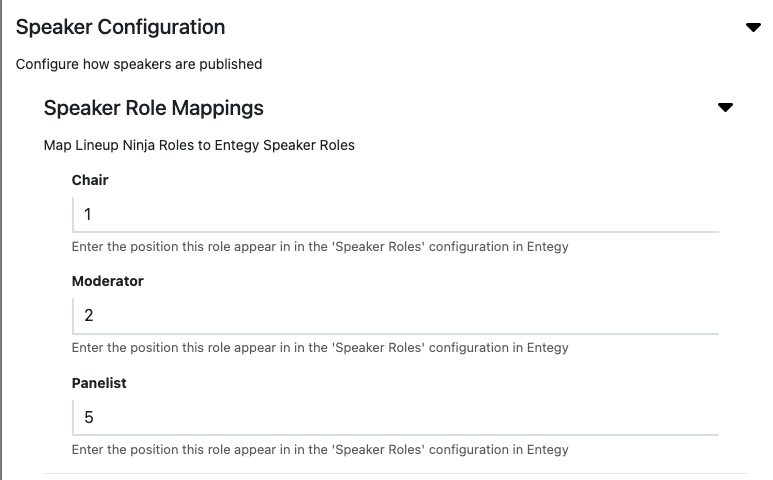
Then on the Lineup Ninja side navigate to the configuration and expand ‘Speaker Configuration’ and then fill in the positions in Entegy.
For example
Warning
If you change the order of the Speaker Roles in Entegy you MUST update this configuration in Lineup Ninja otherwise your mappings will be wrong.
How can I filter the published content?
You can filter which Speakers and Sessions will be published based on a number of criteria. Some common use cases for filters are:
- Preventing ‘Placeholder’ sessions from being published
- Holding back a Speaker who is not yet ready to be announced
- Excluding sessions scheduled during the ‘build up’ day for the event
- Only publishing speakers who have confirmed their slot
- Removing a particular location, or track from the published schedule
- Anything you can think of using labels!
For Speakers you can filter in 3 ways
- Choose which speakers are to be published based on their relationship to sessions
- (If Speaker Confirmation is enabled): Publish speakers that have a confirmed session that is published and not filtered out.
- Publish speakers that are speaking on any session that is published and not filtered out.
- Publish all speakers
- Publish no speakers
- Apply more granular filters with labels
- Only publish speakers with a particular label. For example you might want to use a ‘Content Reviewed’ label to flag speakers that have had their content reviewed.
- Exclude speakers with a particular label. For example you might want to exclude a ‘Do not publish’ label to prevent publishing of speakers who are not yet ready to be published.
For Sessions you can filter in numerous ways
- Choose which sessions are to be published based on their relationship to speakers
- Publish All Scheduled Sessions. Publishes sessions regardless of whether they have confirmed speakers or not.
- (If Speaker Confirmation is enabled): Publish sessions that have one confirmed speaker.
- (If Speaker Confirmation is enabled): Publish sessions that have all their speakers confirmed.
- Publish All Sessions (available on Lineup Ninja Agenda App only)
- Apply filters with labels
- Only publish sessions with a particular label. For example you might want to use a ‘Content Reviewed’ label to flag sessions that have had their content reviewed.
- Exclude session with a particular label. For example you might want to exclude a ‘Placeholder’ label to prevent publishing of sessions which are not yet populated.
- Filter by location
- Only publish sessions in a particular location, or locations. This can be useful if you are publishing an agenda for just one or two locations.
- Exclude sessions in a particular location, or locations. This can be useful if you have scheduled sessions in your Green Room or similar back stage location.
- Filter by resource
- Only publish sessions needing a particular resource. This could be useful if you are producing an agenda for a particular team that manages some resources.
- Exclude sessions needing a particular resource.
- Filter by Date
- Only publish sessions in a date or dates. Useful if you are producing an agenda for a particular day.
- You can exclude a date or dates from your publication. Useful if you have dates for build up and tear down in your agenda.
- Filter by Track
- Only publish sessions in a particular track or tracks. Useful if you are producing separate agenda for separate parts of your event
- Exclude sessions on a particular track. Can be useful to block presenting of a track until a product launch has happened.
To configure filters:
- Click ‘Publish Agenda’
- Click on the name for your existing publication
- Click ‘Configure’
- Expand either the ‘Speaker Configuration’ or ‘Session Configuration’ section
- Expand the corresponding ‘Filter Speakers’ or ‘Filter Sessions’ sections and configure the filters you need
- Save and republish
How can I embargo content that is not yet ready for the public?
You can choose to embargo session titles and descriptions if you have content that should only be shown to the public after being announced in the event.
An embargo is applied by using labels to identify the sessions that should have an embargoed session title or description.
For example if you have a label ‘New Product Launch’, you can configure an embargo to hide the session title and description from sessions with that label. Following the launch of the product you can remove the embargo and republish the agenda.
If you embargo a session or description you can replace the original text with something to indicate that the session will be published later, for example ‘Super Secret Session’.
The speakers for a session will still be shown when it is embargo’ed. To exclude a session, including it’s speakers from being published then use ‘Session Filters’ rather than an ‘Embargo Content’.
To configure an embargo:
- Click ‘Publish Agenda’
- Click on the name for your existing publication
- Click ‘Configure’
- Expand the ‘Session Configuration’ section
- Expand the ‘Embargo Content’ sections and configure the embargo that you need
- Save and republish
How can I merge locations when publishing?
When publishing you can merge content together. This enables you to publish a simpler agenda for your attendees than the one you are using to plan your event.
You can choose to merge these types of data:
- Locations. Merging location A into location B will show all sessions in location A as taking place in location B. This can be useful if you have multiple locations configured for scheduling purposes that will be experienced by the attendee as a single location.
When merging the location that you are merging into does not have to have any sessions itself. So you can use this to show a different name to attendees than you are using internally. For example you could create a ‘Main Hall’ location, and merge ‘Building B - Hall A’ into that location so attendees see ‘Main Hall’ in their agenda.
How are Titles and Post Nominals handled?
By default titles and post nominals are merged into the name of the speaker in Entegy. If you do not want to publish them you can configure this in ‘Titles, Post Nominals, Position and Company’
How are Sub Sessions handled?
If you are using Sub Sessions the following will happen:
- Speakers on the Sub Sessions will be merged into the parent.
- You can optionally choose to include the titles and timings of the Sub Sessions in the description of the parent session.
You can find the configuration in the ‘Session Configuration’ / ‘Sub Session Configuration’ section of the integration configuration.
An example template is provided for including the timings of the Sub Sessions. If you require additional placeholder fields please get in touch.
You can choose between 24hr and 12hr time for the times for the Sub Sessions. Times will be shown in the timezone of the event.
Tracks assigned to Sub Sessions are ignored for this integration because it only supports one track per session.
How can I publish automatically?
Warning
Consider your teams workflow as a team before enabling automatic publishing. When you enable automatic publishing there is a potential for the agenda to be published when you have content that is not ready for publication.
To schedule publishing scroll down to the ‘Scheduled Publishing’ part of the configuration.
You can then choose whether to publish once per hour, or once per day. If you choose to publish each day the publication will occur around 3am in the timezone of your event.
Still can’t find what you’re looking for? Email support@lineupninja.com and one of the team will get back to you as soon as possible.